Monday 30 March 2015

Deep Dish Pizza


Do you ever have one of those days where you feel like everything takes longer than you expected?  The days where you only get out of the house in the afternoon to do a billion errands?  Traffic is heavy, the stores are busy and you end up at home right at supper time.  This is exactly what happened to me the other day.

Now I'm all for homemade, healthy food options. But do you know how many meals we make in a year?  If you only cooked two meals a day for five days a week (I'm leaving room here for left overs) that's 480 meals you've made in a year.  So sometimes I'm all for adding a jar of this or a can of that.  Sometimes.  This was one of those times. I seen this recipe and I knew this would be great for a busy day.


The first thing I did was throw my bacon in the oven, yep that's right I said oven.  Check out how  here


Then I put my pan on medium heat and squeezed my sausage from the casing and broke it up with my spoon as it cooked, so i would have little pieces of sausage to scatter throughout.


Next find a "deep dish" to cook your pizza in and spray with cooking spray (make sure to spray up the sides a bit too) and place your Pillsbury pizza dough inside pressing up against the sides of dish. Spread your pizza sauce on top with the back of a spoon.  At this point I decided to look at the back the package for the dough and it told me to pre-bake dough for 8 minutes sans sauce.  But when I had read the Pinterest recipe it didn't say to do that.  So I just continued on and disregarded the package instructions, since I didn't really see the point of pre-baking anyways.


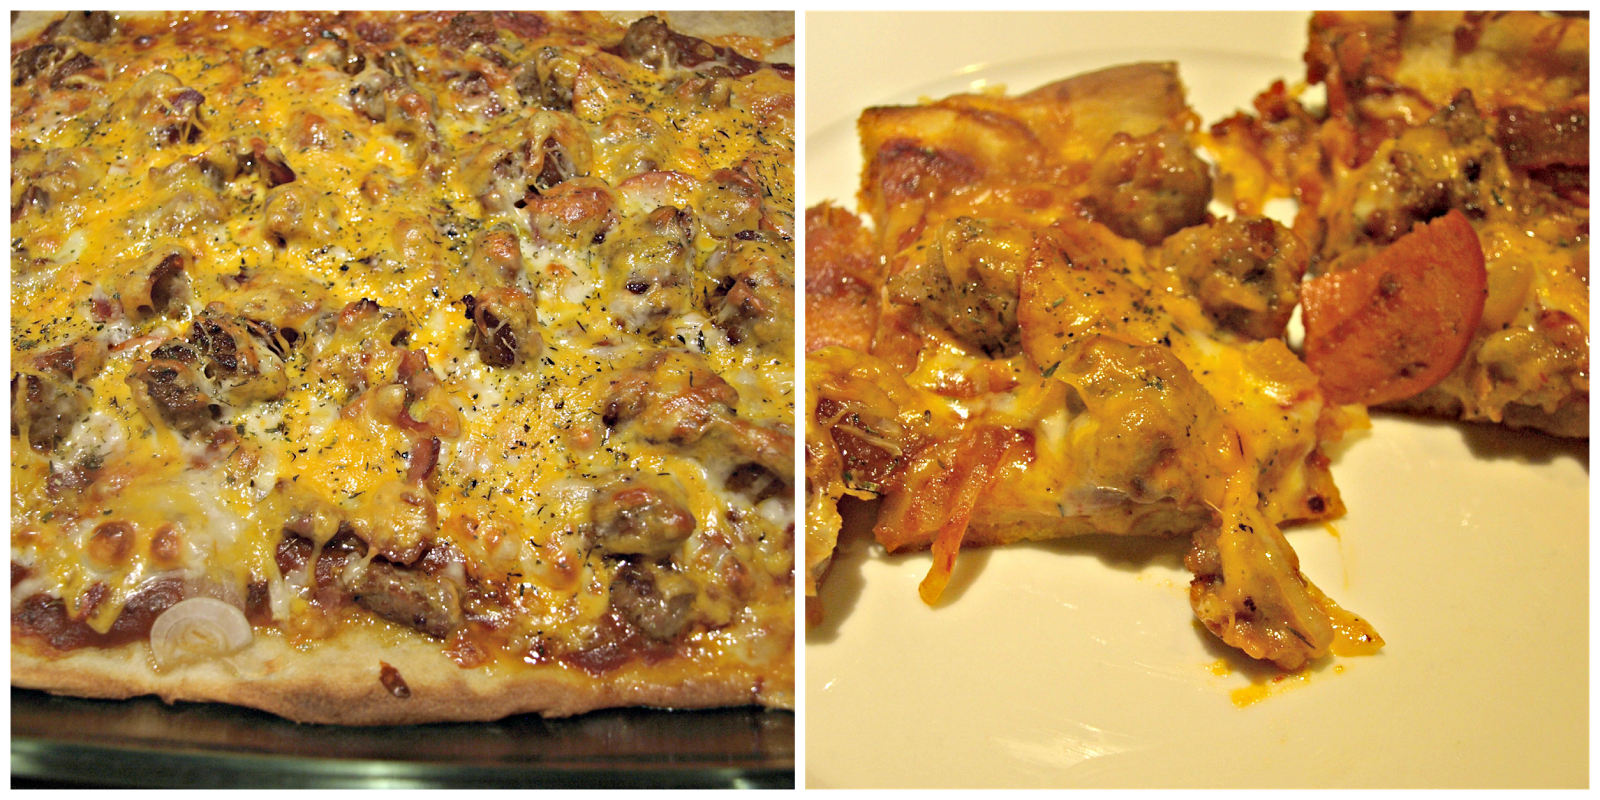
Then add the rest of your toppings.  Mine were onions, peppers, pepperoni, cooked sausage, bacon and of course cheese, lots of cheese.

Put in the oven at 400 degrees (bonus oven is already at 400 degrees from bacon)


Bake for about 20 minutes.

My extra step was to top with a few drizzles of olive oil and Italian seasoning and broil for a few minutes until cheese is a little bubbly and slightly browned.

YUM!


A quick easy deep dish pizza.  This is a great base for leftovers.  Left over chicken, sausage, ground beef, even ham can be used up on this quick pizza. 


Friday 27 March 2015

DIY Gift Box


I started an Etsy shop last year, I sell mostly handmade jewelry and baby mobiles (look out for a giveaway soon). A follower of this blog and my Etsy shop commented that they would like to see a tutorial of how I make my packages.  I thought this was a great idea since it was my biggest dilemma  figuring out how I was going to ship my items.  My first sale came along I was so excited!  I hurried and scoured the city looking for a small, pretty box to ship my handmade earrings safely.  I couldn't find a suitable box.  I ended up going into a jewelry store and convincing the salesperson to sell me one jewelry box for $1.00.  I ran to the post office to ship my items and ended up paying more shipping than I had charged my customer.  I figured out the hard way the my packages had to be a certain height and had to fit through a certain sized opening for me to get the best deal in shipping charges.  My first sale wasn't a financial success.  I decided not to give up on shipping my items in a pretty way.  I didn't want to just throw them in a bubble wrap.  I wanted my customers to get excited when the open their envelope to find a pretty package.  I found the perfect pin to make my own pretty boxes that would be "flat" enough for me to ship. Here's how I make my lovely packages, these are great for gift giving and can be made any size.


You will need Bristol board or you can use patterned card stock(I just like white Bristol board so I can customize mine, and since I make lots of these the price is right), a ruler, pencil, eraser, scissors, and any extra things to decorate your package. I use a stamp,ribbon , and I make a tiny origami crane for mine.


use your ruler to make your box.  This should be slightly bigger then the item your packing up since this is the part your item will be in. Try and lightly mark your paper since you will want to erase your lines after its all finished. (I made mine a littler darker so you could see the lines in the photo).  *Tip* if you are using Bristol board draw on the non-shiny side it will erase better.


Use your ruler to extend your lines for each side of your box.  My square is usually a little bigger than a business card. About 3 inches. Your lines should extend far enough that when they fold down they overlap slightly, so you can tape them down. On my 3 inch square they are a little over the 2 inch mark.  These will become your flaps.


round off the ends of your flaps.


Cut out and decorate.


Pre-fold down your flaps, insert your item and tape down flaps.


Add ribbon and your are all done!  Sine my boxes are usually the same size I save one of my cut-outs as a template so when I need one I just have to trace my template and cut out and decorate. 


These can be made any size just increase the size of your box you make in the first step.  I haven't tried it yet but I'm sure you could even do this the size of the entire Bristol board to wrap a sweater or small blanket.  Give it a try next time you have a gift to give.


Tuesday 24 March 2015

Taco Tuesday


A few days ago when cleaning out my freezer I discovered some ground beef that had been sitting in there too long.  Usually when this happens it means Taco night!  Taco Tuesday anyone?  I don't actually remember if it was a Tuesday when we had the tacos, I just really love the Lego Movie!  Anyone out there know what I'm talking about?  Anyways, I've been wanting to try this pin I'd seen for baked tacos for a while now.  I had a taco kit, I had ground beef, mission was a GO!  So, technically this Pin was a more complex recipe including homemade taco seasoning.  Please guys don't get me wrong, I'm all for making your own taco seasoning!  But I got the taco kit on sale and, well, I'm a busy girl.  Who are we kidding, I'm ashamed.  Very, very, ashamed.  Now that I've got that off my chest let's continue.  The first thing I do when getting supper ready is get all my ingredients out and prepare as much as I can before I actually start cooking.  This is especially important if the meal comes together quickly.  This recipe only takes about 20-25 minutes from start to finish.


I start by preheating my oven too 400°F per the instructions from the recipe I pinned.  Then I begin to prepare my beef according to the directions from the taco kit.


Now pretty much all you have to do is fill up your tacos with meat and cheese.  


Here's what mine looked like before they went into the oven.  You'll notice that I have half hard and half soft tacos.  I bought the half and half kit, so I thought that it would be a great opportunity to test both for you guys.  


Here's what they looked like after about 8 minutes.  The pin recipe said to cook them for 10 but I kept an eye on them and felt like they looked about right at the 8 minute mark.  Maybe my oven is a bit hotter, who knows.  


Yummy!
You guys have to try this recipe out next time you have a taco night!  You know how everytime you eat tacos they always crack right down the bottom making a massive mess!  Well not anymore!  The shells became just a little softened during cooking, they had great texture!  As for the soft tacos, the sides didn't stand up very well while they cooked as you may see in the picture.  They also stuck to the glass dish.  Cooking spray should help with this problem.  I think I liked them just as much as the hard tacos though!  They were so delicious!  I think I ate four!  And I made a big taco salad the next day for lunch. 

You guys gotta Pin this one!


Monday 23 March 2015

Watercolor Tree


I've really been getting into watercolors lately.  I started a watercolor board on my own Pinterest and started pinning what appealed to me.  So far I've been enjoying painting flowers the most.  I came across this tutorial on Pinterest a bunch of times and finally got around to clicking on the link.  The process looked so easy!  It was easy!  And the beautiful thing about this project is that every tree you paint is going to look different! It's completely unique, and fun.


Here's what you need.  I used three colors, Bright Yellow, Crimson and Ultramarine Blue.

Now in case you are wondering, that is a gift back in the picture above.  My original idea was to paint my tree on these gift bags I got from Dollar Tree.  This was a complete failure!  The bags somehow repel water, which is not what you want.  So I ended up painting my tree on inexpensive watercolor paper.


The first step for this project is to spray your paper lightly with water.  I tried to keep the water just in the general area I wanted to have my tree.  Then you "tap" in your colors.  Yellow, blue, then red.


When you are happy with the amount of color you've got going on, pull out your spray bottle again and gently begin spraying.  Above is just a couple of sprays.  Looking good so far! 


A couple more sprays and this is what I have.  Now comes the most important part...PATIENCE.
You have to let it dry completely before you paint in the tree trunk.


Here's my finished product.  This was so easy.  I'm going to give it a try with the little dude soon!  I think there might be a little more mess though!  I really love this Pin, so don't Pin it and forget it! Give it a try!


Friday 20 March 2015

Spice Organization


I have a confession to make!   It's been weighing on my mind for some time actually.  It has even been on my husband's mind...My spice drawer, it's a mess!


Until I read the The Organized Pantry blog post.  I was sitting down with my morning coffee, contemplating what I was going to do with it.  I didn't want a spice carousel on my counter and those small spice jars, well they don't fit an entire packet of spice in it.  What's the point in that?  And then I saw it, Lauren's post about this very thing.  I read it and felt her exact feelings. The anxiety, the frustration and then the relief in finding the answer.  Mason jars!  I love me some mason jars. So I ran out and got my jars (I used the Bernardin 250ml jars, because they pretty much fit a whole pack of spice and fit perfectly standing up in my drawer) and I got my label maker.


   I removed everything from my drawer and gave my drawer a good bath (I really dislike those spice envelopes, they never close right again and my drawer showed it, spice dust everywhere)!  I used my canning funnel as Lauren suggested (wiping it down between spices to avoid contamination, because I didn't want to be the first to discover curry flavored cinnamon).  Then you just make a label for each spice and put it on your lid.  I also arranged mine alphabetically because I was that excited!


Things I learned from organizing my spice drawer:

1.  I seem to always think we are out of chili powder and cumin (I had two packs of each). When you have an organized spice drawer or rack you can easily see what you need and what you don't. I found out I was low on garlic powder.  Say goodbye to duplicates.

2.  With this system it's going to cut down on cooking time for me, I spent a lot of time looking for spices, getting frustrated and messy in the process.

3.  My spices will stay fresher longer, since those Ziploc envelopes never closed right for me. Yes, spices have an expiry date. They don't necessarily go bad but they lose their potency.

4.  I have room for more spices.  My spice drawer is actually really big.  It was so crowded before but now I have I have lots of room to add more. 


Please don't judge me on my embarrassing before picture of my spice drawer.


Don't forget to pin this one, it's a life changer!


Wednesday 18 March 2015

Wine Glass Lanterns


When I seen this Craft I immediately had to try it.  It looked so easy and I had everything on hand.  The link even had a printable template to make my shade.  I grabbed my scrapbook paper, printed and cut out my template, found a wine glass and got to work.


 Instead of tracing my template onto my paper, I just rolled a piece of tape to make double sided tape and stuck it on.


After I cut it out , I wrapped my paper around the glass to see where the two ends of the shade would meet, then I taped them together.  You could put some glue too at this point if you didn't want to see tape on the outside.  I took the extra step of gold leafing the bottom of my glass.  I just put tape where I wanted my gold to stop and painted it on.  I then lit my tea light and placed it in and put my shade on top.  Wow so pretty!


 I got a little worried with the fire and paper combination, so I bought a two pack of fake tea lights (the battery powered ones) at the dollar tree and they flicker like real candles.


I love this project and will be placing them all over tables at my next party!  Wedding season is almost here and I think this project would be so pretty as table decor!  Use paper different patterns in your wedding colors.  The best part is you can just make a new shade in a different color after, you already have the template.  Or just use the wine glass for their original purpose to have a drink after your event.  This one is a keeper!


It glows really pretty too!


Monday 16 March 2015

In A Hurry Cinnamon Buns


You've probably seen this Pin for 8 Minute Cinnamon rolls at one point or another.  I probably shouldn't have made them considering I was in a real munchie mood when I did.  The chances of me eating them all on my own were pretty high. But of course I went ahead and made them anyway.  Here's how it went.


You'll need these ingredients, plus butter for your muffin pan.  


Go ahead and open up your Pilsbury Crescent Rolls.  Try to get the dough out in one piece.  It will make it easier to roll out.  Now the recipe says to do this in 2 batches.  I apparently didn't read this properly (detecting a trend here) and rolled it out in one.  Hey if anything it saved me some time.  I recommend dusting your work surface with a little icing sugar to prevent sticking.  Roll out your dough just slightly, and pinch all the seams tightly.  You don't want those seams coming apart when you go to roll out your buns. 


It's totally up to you but I opted not to brush my dough with butter.  This dough is full of butter anyways and honestly in the end, it was still decadent and delicious.  Sprinkle the dough with as much cinnamon and brown sugar as your heart desires.  Can you tell which side I did, and which side my little guy did?


Roll up your dough.  Now here's where my lack of reading the recipe got me in trouble.  Because she did half the dough at a time, she cut each half into 8 buns. So I was thinking wow these are going to be big!  I went with it anyways, but I cut one of my 8 buns in half to see what the difference in size and cooking would be. So in the end I got 9 cinnamon buns.

A serrated knife works well for cutting the dough.

Butter your muffin tin will so they don't get stuck with all that brown sugar.  Bake for 8-10 minutes at 375°F.


A note on the icing from this recipe.  The recipe calls for 1 teaspoon maple syrup, 3/4 cup of icing sugar and 1 tablespoon milk.  I had to add an extra tablespoon of milk, there was no way the icing would be drizzle-able with only 1 tablespoon.  I also added a bit of vanilla. 


I am never going to admit whether or not I ate them all!

I definitely recommend this recipe.  The crescent rolls are a great short cut.  I plan to keep a can in the fridge to make these the next time I have last minute guests.