Showing posts with label Pins We Love. Show all posts

Wednesday, 8 April 2015

Crockpot Teriyaki Chicken


This past weekend I had a special visitor.  My mom came down for the long weekend.  I needed a babysitter for Saturday so she decided to stay up for a couple nights.  My Ma lives 90 minutes away.  I know it's not that far.  But when your mom is your best friend, anything further than walking distance is hard!  We spent all of Sunday together and we had the most lazy, relaxing day.  Days like this call for Crockpot meals!  I have had this recipe for Teriyaki Chicken kicking around my Pinterest for a few weeks now and I've been dying to try it.  Finally boneless skinless chicken breast went on sale so I picked some up Friday so we could give it a go.

Here's what you need.


I made three changes to the recipe.  First, I didn't have Cider Vinegar on hand.  The recipe calls for 3 tablespoons.  My substitute, 2 tablespoons White Wine Vinegar + 1 tablespoon Apple Juice.  Second, the recipe calls for 1 clove of garlic.  I refuse to follow any recipe that calls for only 1 clove of garlic on the grounds of principle.  I added 2.  Third, I reduced the amount of sugar in the recipe from 1/2 cup to 1/4 cup.  


The recipe was very easy to put together.  All you do is mix the ingredients and pour over the chicken.  Personally I think you might as well mix all your ingredients in the crockpot and then put your chicken on top and stir it around.  Why make more dishes?? According to the recipe you are to cook this on low for 4-5 hours.  I must absolutely express here the importance of getting to know your crockpot! Mine gets really hot!  In fact, the 'keep warm' setting actually boils any liquid in the pot!  My chicken was perfectly cooked after only 3 hours on low! 


Next step is to remove and dice the chicken.  Strain the liquid into a sauce pan and bring to a boil.  Then you have to add a slurry of cornstarch and water (2 teaspoons of each) and let boil until thickened.  This only took me about 30 seconds.


Toss the chicken in the thickened sauce and you're all set!  We served our chicken with rice and broccoli.


This was delicious! The chicken was tender and juicy and the sauce had just the right balance of flavors.  Give this one a try.  It's worth a Pin!
Here's a printable recipe for you!


Friday, 20 March 2015

Spice Organization


I have a confession to make!   It's been weighing on my mind for some time actually.  It has even been on my husband's mind...My spice drawer, it's a mess!


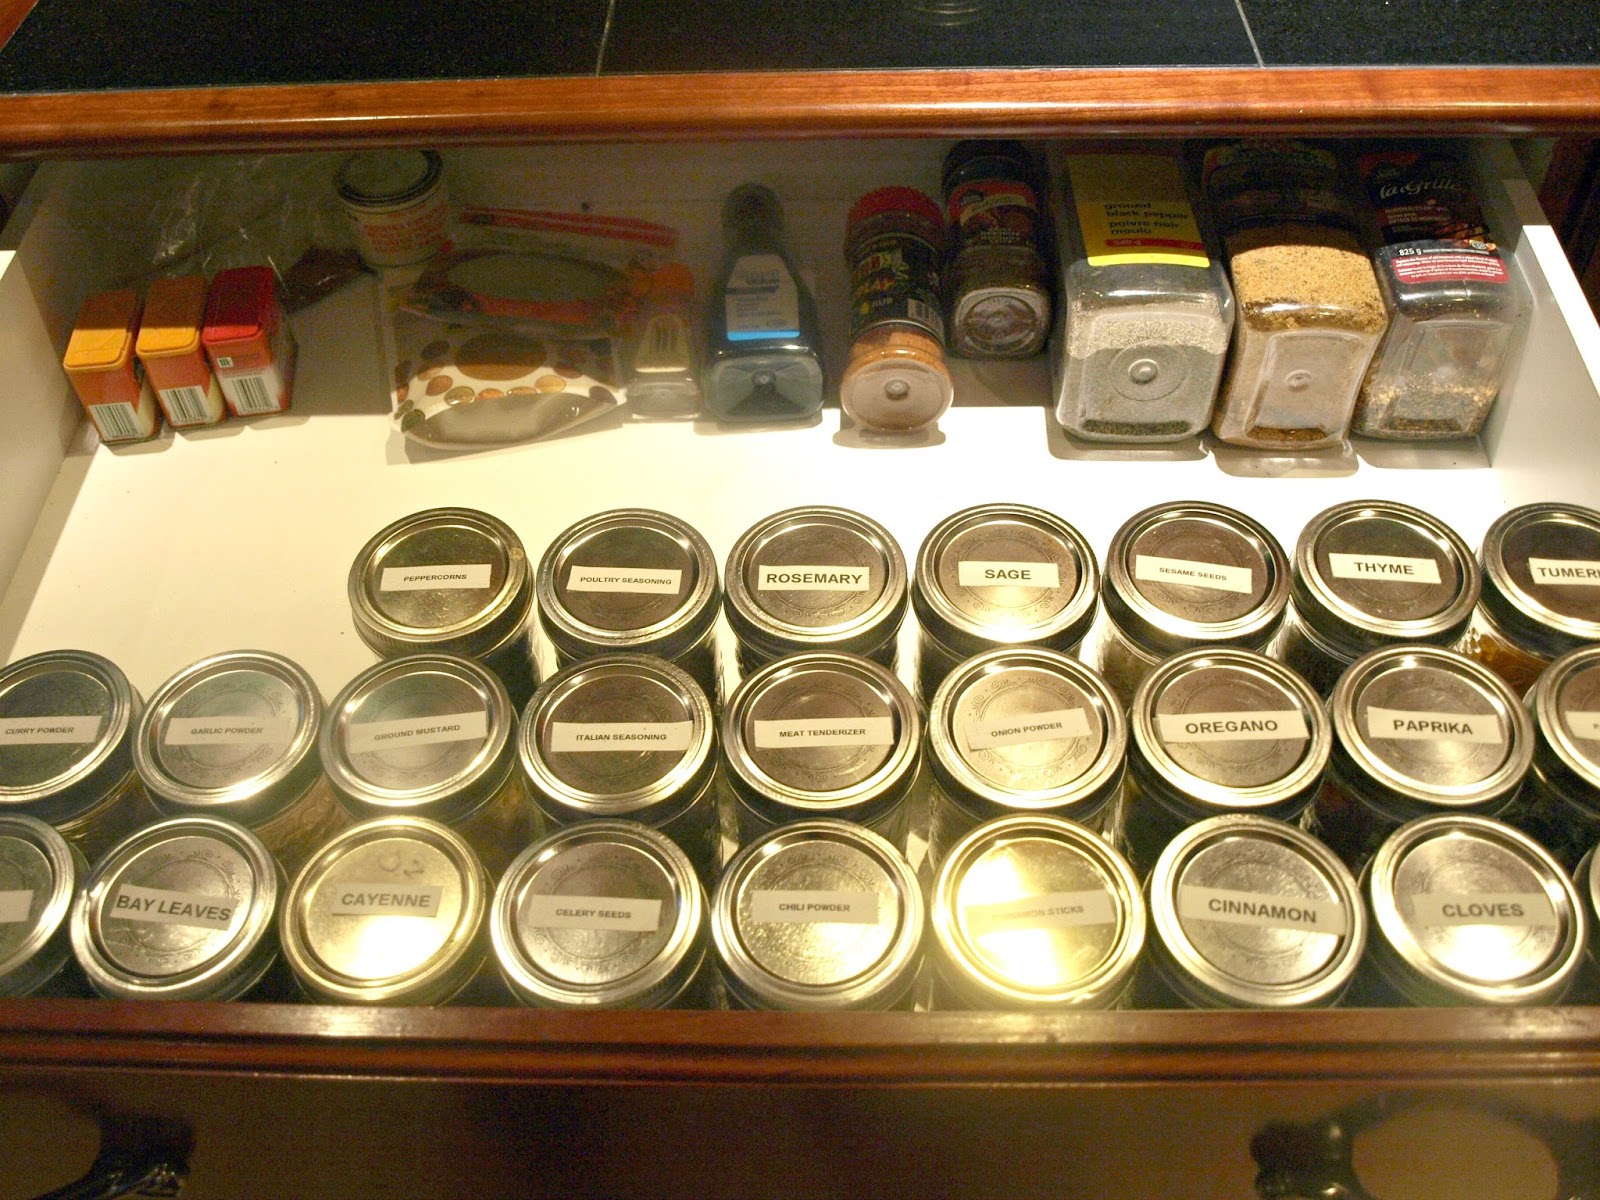
Until I read the The Organized Pantry blog post.  I was sitting down with my morning coffee, contemplating what I was going to do with it.  I didn't want a spice carousel on my counter and those small spice jars, well they don't fit an entire packet of spice in it.  What's the point in that?  And then I saw it, Lauren's post about this very thing.  I read it and felt her exact feelings. The anxiety, the frustration and then the relief in finding the answer.  Mason jars!  I love me some mason jars. So I ran out and got my jars (I used the Bernardin 250ml jars, because they pretty much fit a whole pack of spice and fit perfectly standing up in my drawer) and I got my label maker.


   I removed everything from my drawer and gave my drawer a good bath (I really dislike those spice envelopes, they never close right again and my drawer showed it, spice dust everywhere)!  I used my canning funnel as Lauren suggested (wiping it down between spices to avoid contamination, because I didn't want to be the first to discover curry flavored cinnamon).  Then you just make a label for each spice and put it on your lid.  I also arranged mine alphabetically because I was that excited!


Things I learned from organizing my spice drawer:

1.  I seem to always think we are out of chili powder and cumin (I had two packs of each). When you have an organized spice drawer or rack you can easily see what you need and what you don't. I found out I was low on garlic powder.  Say goodbye to duplicates.

2.  With this system it's going to cut down on cooking time for me, I spent a lot of time looking for spices, getting frustrated and messy in the process.

3.  My spices will stay fresher longer, since those Ziploc envelopes never closed right for me. Yes, spices have an expiry date. They don't necessarily go bad but they lose their potency.

4.  I have room for more spices.  My spice drawer is actually really big.  It was so crowded before but now I have I have lots of room to add more. 


Please don't judge me on my embarrassing before picture of my spice drawer.


Don't forget to pin this one, it's a life changer!


Wednesday, 4 March 2015

Coconut Oil Hair Treatment


There's something about me you should know.  I love, love, love the smell of coconuts!  It reminds me of vacation.  Which kind of makes me sad because I haven't been south in over a year now and I won't be going anytime soon.  (Pause to look out the window at the deceptively sunny sky, the 5 feet snow on my front yard and my street that has not been cleared of snow since mid-November)
Sorry I got a bit distracted there.  The point is, I love the smell of Coconuts.  But, I hate the taste of coconuts! Actually that's not true.  I do love Red Lobster's Coconut Shrimp!  I'm a complicated woman.

This week I tried a Coconut oil hair treatment.  Tessa had told me it worked really well for her so I thought "why not?"  My coconut oil is also about to expire so I thought I should use it up.  Does anyone know if coconut oil actually goes bad?

All you really have to do for this treatment is plaster your entire head of hair with melted coconut oil, then wrap your hair in a towel or a shower cap. Leave it in for at least 30 minutes and shampoo it out 2 or 3 times.

Here is a before and after pic.


My before pic is from Wednesday.  I washed and conditioned my hair as usual and blow dried it upside down with no product in it with a round brush. For the record I usually use an anti-breakage serum when I dry my hair but I wanted to keep it simple so we could really see how well this worked. So, the next day I did the treatment.  I left it in for half an hour.  I shampooed my hair 3 times to make sure there was no oil left.  There is nothing worse than washing and styling your hair only for it to end up greasy!  If it happened to me I would have quit and gone back to bed.  I styled my hair the same way as the day before.  My hair was not particularly dry or damaged prior to using the coconut oil treatment but I still noticed a difference after I dried my hair. It just felt so much smoother and softer.  I definitely give this Pin a thumbs up. 

Give this one a try yourself!  Here is the link for full instructions.


Monday, 2 March 2015

Glow Bath


I've seen this pin a billion times, so when I saw glow sticks at The Dollar Tree today I didn't hesitate to throw them in my cart (especially since I have a sick little one at home who's been fighting bath time). He won last night...not tonight, I have glow sticks!!

I showed him what we were going to do, have a bath with our "special lights".  He got pretty excited so I started the bath water, turned off the lights and started to "activate" the glow sticks.  I turned around to what I thought would be a frustrated little boy, but he just couldn't get his clothes off fast enough to get in the bath (wow!?...since when have you acquired this skill of taking off your own clothes?...BUSTED!) I think I'll be buying more glow sticks sooner rather than later, I'm calling this a great success!!

* Bonus, the glow sticks were still bright enough to use the next day for bath again!


Monday, 23 February 2015

Clementine Candle


The other day a reader sent us a special request to test out a pin.  A pin that's been floating around Pinterest for years and re-pinned A LOT! The Clementine candle Pin.  I remembered trying this pin when I first started a Pinterest account and it was a total fail.  It was actually in my Pinterest fails board when I checked. So I clicked the link and watched the tutorial to find out that when I had done it the first time I hadn't watched the tutorial.  In fact I don't think I even clicked the link. So I was ready to try again in hopes of a success story.


I cut around the clementine (not all the way through just through the skin), then I carefully put my finger in and pulled the skin away from the flesh. I thought this would be the hard part, it wasn't.


 The hard part was getting what would end up being your wick out. It's that long piece of white pith that runs up the middle of the orange.  I kept getting both "bowls" off but no wick. This time I gently rolled the orange  and squeezed it and the wick came out  (I don't know if this helped or if my orange was just more ripe).


You then put olive oil in your bowl end with the wick, I made sure to drip a few drops of oil on my wick. Let it sit a few minutes so the wick soaks up the oil.


 In the meantime cut a design or just a hole in the top end of your clementine. Then lite, place lid on and enjoy.


 SO it worked! I was pretty surprised, I was thinking this was going to be a fail again. But it worked and was really pretty.


Only one catch, it doesn't smell pretty.  I know what you're thinking, nice warm orange smell, what's not to love.  It smells burnt, nothing like you think it will.  Mine burned for 30 minutes with the lid on, then I couldn't take the smell anymore.  I let it burn a bit more with the lid off for a total of 1 hour. I would say you need to try this at least once.  Be prepared to eat a lot of oranges and to not enjoy the smell.


.

Saturday, 21 February 2015

Tote Bags

Every second week I host an art/music class for kids 4 and under (yes I'm slightly crazy).  It's a "mommy and me" class as I like to call it.  All my crafts are Pinterest projects and I usually test them out on my almost three year old before we do them with others.  We've had some great projects. This weeks project was a huge hit, every single kid loved this one.  I know I sound surprised but I have a large age range (1-4) and so sometimes it's hard to find something that everyone can do and will love to do.  This project was a great success!  This is the original Pin.


Now unless you have a very meticulous child your bag will look nothing like this, but it's really not about the end result it's about the process and how much your child enjoyed it! 


All you need is a blank canvas bag, acrylic paint, and some fruits and veggies. We used apples and limes cut in half and we cut the root (bottom) off of a bunch of celery and lettuce to make our stamps.


I really think the key to this project was using fruits and vegetables as stamps. Everyone was excited to see what kind of shape an apple, lime and celery would make.

 PS. Don't skip using the bottom of a cut celery as a stamp it made the coolest most flower-like print.


We found our blank canvas tote bags at the Dollarama. 


Tuesday, 17 February 2015

Whole Wheat Pancakes

A few weeks ago my husband and I were honored to attend a 10th anniversary party for my fellow Pinterester Tessa.  All of the guests received a little jug of maple syrup as a party favor, it also was their place card for the party.


Ever since the party I've been dying to try this syrup! Since I've just started a new diet and workout routine I knew I would feel guilty if I indulged in my usual fluffy white pancakes so this was my chance to do some pinning!  I searched "whole wheat pancakes" on Pinterest and the #1 pinned result took me to a recipe by Sallys Baking Addiction.
Here's how it went....
First I arranged my cast of characters


I had to make some adjustments to the recipe to use what I had on hand.  I used Silk Almond Milk, the original, not vanilla.  I also didn't have any Greek yogurt, but I had some regular yogurt cups which just so happens to measure just over a quarter cup.


In a large bowl mix together 1 cup whole wheat flour, 1/2 cup oats, 2 teaspoons baking powder, 1/4 teaspoon salt and 1 tsp cinnamon.


In a small bowl mix together 1 egg and 1 cup milk, or in my case Almond milk.  Add 3 tablespoons brown sugar, 1/4 cup yogurt and 1 teaspoon vanilla and give it a good mix.


Make a well in the bowl of dry ingredients and add the wet into the dry.  Mix slowly together until just combined.  Pancakes don't like to be over mixed, unless you like to eat pancake hockey pucks.  I'll leave that up to you.


Get your pan or griddle onto medium heat and get a little butter in there! The recipe says to spray your pan with cooking spray, but come on! Live a little!  The recipe also said it yielded 7-8 pancakes when she measured out 1/4 cups of batter.  I made 1/2 cup pancakes and got 4.  So, cook em for a minute or 2 on one side, until the sides start to firm up, give 'em a flip and cook for another couple of minutes. 


The kitchen is smelling real good right now!  Notice the fingers of my little helper?


Yum! These pancakes delivered on every promise.  Fluffy and moist, full of flavor!  But the true test...My almost-three year old, the pickiest of all picky eaters ate one.  I couldn't believe it!  This recipe is a keeper!
Click here for a printable recipe.